2017년 8월 8일 화요일

ds1307 RTC 모듈로 시계구현 하기

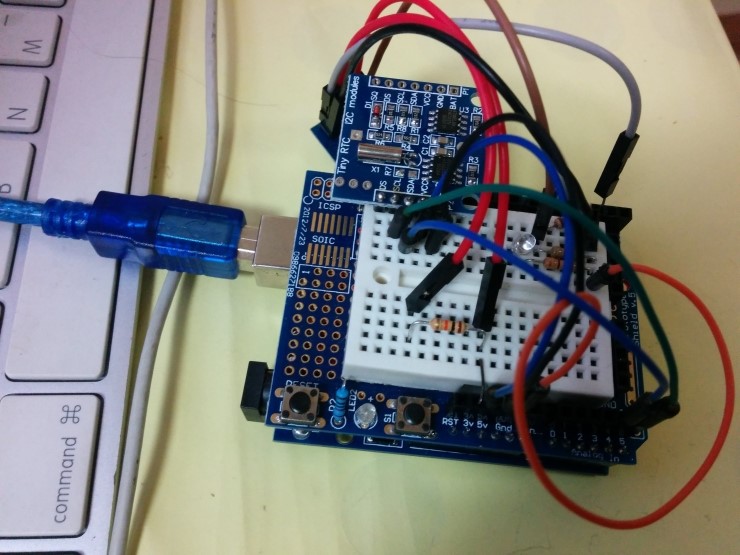
ds1307 RTC 모듈은 뒤에 코인형 밧데리를 끼워서 시간 진행상태를 유지해주는 모듈입니다.

RTC 라이브러리를 아래링크에서 받아서 아두이노에 설치합니다.

RTC 모듈의 SDA 핀은 아두이노 우노의 A4, SCL 핀은 아두이노 우노의 A5에 연결합니다.


// Date and time functions using a DS1307 RTC connected via I2C and Wire lib
 
#include <Wire.h>
#include "RTClib.h"
 
RTC_DS1307 RTC;
 
void setup () {
    Serial.begin(9600);
    Wire.begin();
    RTC.begin();
 
  if (! RTC.isrunning()) {
    Serial.println("RTC is NOT running!");
    // following line sets the RTC to the date & time this sketch was compiled
    RTC.adjust(DateTime(__DATE__, __TIME__)); //현재 시간설정
  }
 
}
 
void loop () {
    DateTime now = RTC.now();
 
    Serial.print(now.year(), DEC);
    Serial.print('/');
    Serial.print(now.month(), DEC);
    Serial.print('/');
    Serial.print(now.day(), DEC);
    Serial.print(' ');
    Serial.print(now.hour(), DEC);
    Serial.print(':');
    Serial.print(now.minute(), DEC);
    Serial.print(':');
    Serial.print(now.second(), DEC);
    Serial.println();
 
    delay(1000);
}

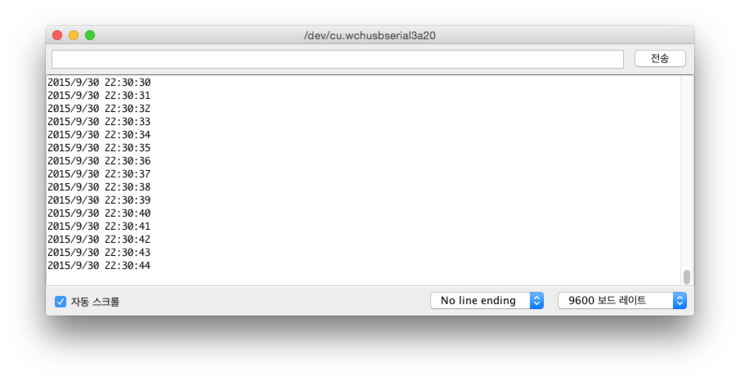
그러면 아래와 같이 시리얼 모니터에 나옵니다.

인체감지 센서(PIR)를 활용한 전등 On/Off

PIR 센서는 인체적외선을 감지여부에 따라 On/Off  디지털 신호를 보내주므로 사용하기 편합니다.

아래 코드는 PIR 센서의 신호를 받아서 LED를 On/Off 해주는 코드입니다.

LED 대신에 릴레이를 연결하고 여기에 전등을 연결하면 화장실 같은 곳에 설치하면

사람이 있는지에 따라 전등이 자동으로 소등되니 전기 절약도 되지 않을까 싶네요. ^^ 

감도는 저항을 돌려서 조절 가능합니다.


/*
 * PIR sensor tester
 */
int ledPin = 13;                // choose the pin for the LED
int inputPin = 12;               // choose the input pin (for PIR sensor)
int pirState = LOW;             // we start, assuming no motion detected
int val = 0;                    // variable for reading the pin status
void setup() {
  pinMode(ledPin, OUTPUT);      // declare LED as output
  pinMode(inputPin, INPUT);     // declare sensor as input
  Serial.begin(9600);
}
void loop(){
  val = digitalRead(inputPin);  // read input value
  if (val == HIGH) {            // check if the input is HIGH
    digitalWrite(ledPin, HIGH);  // turn LED ON
    if (pirState == LOW) {
      // we have just turned on
      Serial.println("Motion detected!");
      // We only want to print on the output change, not state
      pirState = HIGH;
    }
  } else {
    digitalWrite(ledPin, LOW); // turn LED OFF
    if (pirState == HIGH){
      // we have just turned of
      Serial.println("Motion ended!");
      // We only want to print on the output change, not state
      pirState = LOW;
    }
  }
}


온도 습도 측정하기 - SHT71 센서이용

아두이노를 이용하여 SHT71 센서를 이용하여 온도, 습도를 측정하는 방법입니다.

측정값을 시리얼 모니터로 확인가능합니다.

/**
 * ReadSHT1xValues
 *
 * Read temperature and humidity values from an SHTxx-series (SHT10,
 * SHT11, SHT15, SHT71) sensor.
 *
 * Copyright 2012 JAS
 */</code>
#include "SHTxx.h"
// Specify data and clock connections and instantiate SHTxx object
 // Sensor SHT71 power with vccPin & gndPin
 #define clockPin 8
 #define vccPin 9
 #define gndPin 10
 #define dataPin 11
SHTxx sht71(dataPin, clockPin);
void setup()
 {
 Serial.begin(9600); // Open serial connection to report values to host
 Serial.println("Starting up");
 // Power sensor
 pinMode(gndPin, OUTPUT);
 pinMode(vccPin, OUTPUT);
 digitalWrite(vccPin, HIGH);
 digitalWrite(gndPin, LOW);
 }
void loop()
 {
 float temp_c;
 float temp_f;
 float humidity;
// Read values from the sensor
 temp_c = sht71.readTemperatureC(); //섭씨
 temp_f = sht71.readTemperatureF(); //화씨
 humidity = sht71.readHumidity(); //습도
// Print the values to the serial port
 Serial.print("Temperature: ");
 Serial.print(temp_c, DEC);
 Serial.print("C / ");
 Serial.print(temp_f, DEC);
 Serial.print("F. Humidity: ");
 Serial.print(humidity);
 Serial.println("%");
delay(2000);
 }

첨부한 SHTxx.rar 파일을 받아 압축을 풀어 아두이노 라이브러리에 폴더를 추가하면 됩니다.

라이브러리 추가하는 방법은 http://cafe.naver.com/diymaker/6 글을 참고하세요.

참 쉽죠잉~ ^^

SHT71 센서는 정확도는 높지만 비싸서 취미로 사용하기는 부담스럽죠. 

다음에는 좀더 저렴한 DHT11보다 성능이 향상된 DHT22 온습도 센서 사용방법을 알아 보겠습니다.

#참고사이트